Percent of Work Complete:
This will enable users to enter a % of Work Complete value in the % Work Complete field for any task in the My Task page. User can also use the Remaining Work field to adjust the remaining work of the task so that the task duration will be adjusted accordingly, else the Project scheduler will consider that the resource has done the extra work to finish the task in the same duration.
Actual Work Done and Work Remaining:
This will enable users to enter the Actual Work done (hours) in the Actual Work field for any task in the My Task page. User can also use the Remaining Work field to adjust the remaining work of the task so that the task duration will be adjusted accordingly, else the Project scheduler will consider that the resource has done the extra work to finish the task in the same duration.
Hours of Work Done Per Period:
This will enable user to enter the actual work (hours) on a daily or weekly basis for any task in a time phased manner in the My Task page. User can also use the Remaining Work field to adjust the remaining work of the task so that the task duration will be adjusted accordingly, else the Project scheduler will consider that the resource has done the extra work to finish the task in the same duration.
If an organization uses either the Percent of Work Complete method of tracking progress, or the Actual Work Done and Work Remaining method of tracking progress, then it is important for team members to report an Actual Start date and an Actual Finish date on tasks. Otherwise, lacking an Actual Start date, the system assumes the task started AS SCHEDULED, even if it started late. And lacking an Actual Finish date, the system assumes that the task finished AS SCHEDULED, even if the task finished late. By asking team members to enter an Actual Start date and an Actual Finish date, this makes Project Server more date sensitive and help Project Manager to determine the actual against the planned date. So in case of the first two methods the best practice that team members enter Actual Start dates and Actual finish dates, in addition to enter % Work Complete, or Actual Work and Remaining Work. This is the reason that Hours of Work Done Per Period is the recommended method for tracking the Project progress, this method is date sensitive and allows Project Manager to track the date slippage easily.
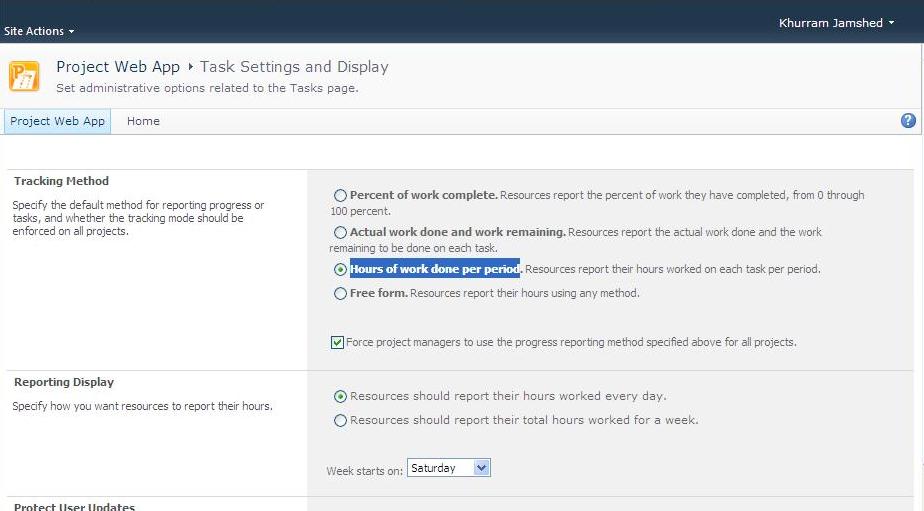
Now let's jump to the more detail explanation with the screen shots to help the reader understand what this all above exactly means. Let me start with the Hours of Work Done per Period option, which is the recommended method to use and can be taken as the best practice to track the project progress. You need to login as an Administrator to configure the Tracking Method:
- Login to PWA as administrator
- Click on server settings
- Under Time and Task Management, click Task Settings and Display
Select the Tracking method
Hours of work done per period:
Once the selection is done, consider the project with the assignments are published to the server and resource has to update the progress through My Tasks. When the resource will login to the PWA and open his My task page, he will be able to see the list of his Project and the tasks along with the time phased reporting window. The highlighted areas in Fig-1, before the user has update the progress, reflects the date the task meant to Start and the Remaining and the Planned work.
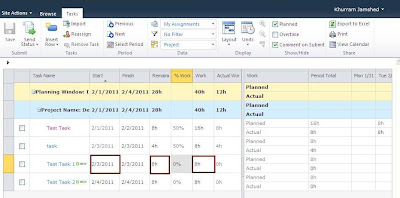 |
| Fig-1 |
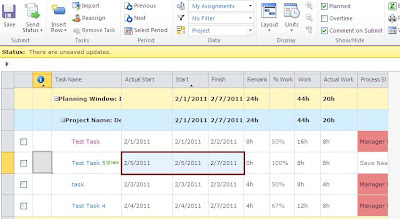
Now assume that there is slip of 1 day in task start, i.e. user finished and updated the progress on 2/4/2011, the user has to mark the actual hours on today's date to report the correct Actual start of the project. Notice the Fig-2 for the change in the Start date after the user has updated the progress of the task. This practice has to be delivered well during the training to the team members, so that they can understand the importance of correct progress update.
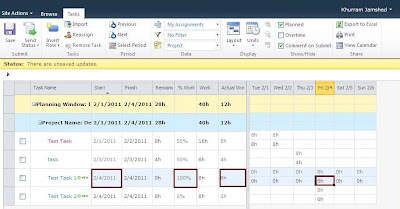 |
| Fig -2 |
As mentioned above the remaining two methods are not date sensitive, so add the Actual Start and Actual Finish columns in the My Assignments view to report the actual start date.
- Login to PWA as administrator
- Click on server settings
- Under the Look and Feel section, click Manage Views
- Under My Work, click My Assignments
- Select the Actual Start/Actual finish from the available fields and add to the displayed fields
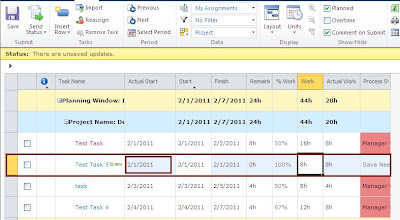
Actual Work Done and Work Remaining:
The resource will login to the PWA and open his My task page, and can notice that the time phased windows is read-only now. User has to report the Actual Work progress (hours) in the Actual work field and can adjust the remaining work field if required.
The actual start date will be equal to the planned date when the user will update the progress even though the task start is delayed, see the Fig-3 for reference:
 |
| Fig - 3 |
User has to change the Actual Start date with today's date, Fig-4, also can adjust the remaining hours if required.
 |
| Fig - 4 |
Percent of work complete method also operates in a same manner, the only difference is that rather than entering Actual Work (hours) to update the progress the user has to enter the %work complete (such as 50% or 80%), see Fig-4 for the reference. The user also has to use the Actual Start field to report any gaps, and can use the Remaining Work field to adjust the work. Also repeated as above that this practice has to be delivered well during the training to the team members, so that they can understand the importance of correct progress update.
This description applies to the Project Server 2007 and 2010 both. I hope this will help understand the functionality and its concept to the readers, and as usual any feedback would be greeted with smile :)